Tuesday 30 October 2012

ClamAV,,OpenSource Antivirus மற்றும் Antimalware மென்பொருள் தரநிலை அமைத்தல்


ClamAV இன் வெட்டும்விளிம்பு பாதுகாப்பு தொழில்நுட்பம் திறந்த மூல மாதிரி ஒரு வெற்றியாகும்.
ClamAV வைரஸ் இயந்திரம், ClamAV கோர் குழு மற்றும் ClamAV சமூகத்திற்கு தொடர்ந்து கண்டுபிடிப்புகள் கூடுதலாக 300,000 க்கும் மேற்பட்ட கையெழுத்துக்களை அதன் பெருகிவரும் வைரஸ் தரவுத்தள தினமும் கையெழுத்து மேம்படுத்தல்கள் வழங்கும்.

உயர் செயல்திறன் Antivirus பாதுகாப்பு
ClamAV திறந்த மூல வைரஸ் தடுப்பு முன்னணி வணிக வைரஸ் தீர்வுகளை ஒப்பிடும் போது தரம் மற்றும் பாதுகாப்பு வழங்குகிறது. Linux வேர்ல்டு 2007, பிணைய நுழைவாயில் விற்பனையாளர் Untangle நடத்திய நேரடி "ஃபைட் கிளப்" நிகழ்வு, பொருட்கள் சோதனை உள்ள அனைத்து 25 வைரஸ்கள் கண்டுபிடிக்க முடியும் பார்க்க ஒருவருக்கொருவர் எதிராக 10 தொழில்-முன்னணி வைரஸ் தீர்வுகளை உருவெடுத்தது. அனைத்து 25 வைரஸ்கள் பிடிக்க மூன்று வைரஸ் எதிர்ப்பு தயாரிப்புகளின் ஒரு - ClamAV 100 எதிர்கொண்டது வைரஸ்கள்% கண்டறியப்பட்டது.

திறந்த மூல கண்டுபிடிப்பு ஒரு வலுவான அறக்கட்டளை
ClamAV என்ற  ஓப்பன் சோர்ஸ் சமூகத்திற்கு அதன் தற்போதைய பொறுப்பு பிரதிபலிக்கிறது. Sourcefire திறந்த மூல பாதுகாப்பு சமூகத்தின் மதிப்புகளை பின்பற்றுவதில் போது ஒரு வணிக நிறுவனம் கணிசமான வளங்கள் திட்டம் ஒன்றி கலப்பதற்கும் இரண்டு உலகங்கள் சிறந்த வழங்குகிறது, ஒரு ஓப்பன் சோர்ஸ் (GPL) தீர்வாக ClamAV உருவாகிறது மற்றும் வழங்குகிறது.

ClamAV எஞ்சின்
வெறுப்பு காண்பிக்கும் வகையில் சீற்றொலி உண்டாக்கு மற்றும் ClamAV ஒன்றாக பாதுகாப்பு துறை மிக பரவலாக ஏற்றுக்கொள்ளப்பட்ட திறந்த மூல திட்டங்கள் இரண்டு கொண்டுவருகிறது. தீம்பொருள் மற்ற வடிவங்கள் வைரஸ்கள், ட்ரோஜன்கள், ஸ்பைவேர் இருந்து, - ClamAV அச்சுறுத்தல்கள் பரந்த இருந்து தொழில், முக்கிய பாதுகாப்பு வழங்க Sourcefire திறன் மேம்படும். ClamAV கூட எதிர்ப்பு ஃபிஷிங் தொழில்நுட்பம் கொண்டுள்ளது.

ஒரு நாள் பல மடங்கு மேம்படுத்தப்பட்ட ClamAV கையொப்பம் தரவுத்தளம், தற்போது கண்டறிதல் மிக அதிக விகிதத்தில் புதிய பதிப்புகள் கண்டறிய முடியும் என்று பொதுவான கையெழுத்து உட்பட 300,000 கையெழுத்துக்களை, கொண்டுள்ளது.

Sunday 28 October 2012

How to install Samba Server on ubuntu

How to install Samba Server on ubuntu


samba is a good choice for sharing files between Ubuntu and Windows computers.

To install samba server,you can just run following command in terminal:

sudo apt-get install samba smbfs

After installed samba,we need to configure it to make it accessible by following command

sudo gedit /etc/samba/smb.conf

At following screen,change and make it look like the marked section

Now create a samba user by following command

sudo smbpasswd -a username

And add that username to the smbusers file.

sudo gedit /etc/samba/smbusers

Add in the following line, substituting the username with the one you want to give access to

ubuntuusername = “samba username”
Use the name you created in “sudo smbpasswd -a username” instead samba username

The Indian Rupee sign

The Indian Rupee sign

The Indian Rupee Sign (₹) has been supported in the Ubuntu Font Family since version 0.69. This was included in the Ubuntu 10.10 operating system release. Ubuntu 10.10 is the first operating system to ship with out-of-the-box support for displaying the Indian Rupee Sign, and this happened on 10 October 2010 (2010-10-10).

To display the sign, you must have a font—such as the Ubuntu Font Family—with support for the character. For K/Ubuntu 10.10 users, this is automatic.

The sign can be inserted in your own documents using copy-and-paste from another location, or using the Unicode-entry method:

  • Ubuntu 10.10: <Ctrl-Shift-U> 2 0 b 9, then <Enter>
  • MS Windows: Press-and-hold <Alt> 2 0 b 9, then release <Alt>
  • Kubuntu 10.10: Copy-and-paste ''
  • HTML: insert "&#x20b9;"

 ₹

The designer

The original designer of the Indian Rupee Sign is who was awarded the prize on by the Indian Government. The codepoint at U+20B9 was assigned by the Unicode consortium on .

The glyph for the Ubuntu Font Family was contributed by on . Version 0.69 of the Ubuntu Font Family was uploaded on . This hopefully demonstrates the advantage and speed possible when using open development.

Saturday 27 October 2012

Getting to Know Linux: Installing From Command Line

For users new to the Linux operating system, nothing beats installing applications with the graphical Add/Remove Software applications found in the main menu of your desktop. But sometimes that ever-so-user-friendly GUI isn’t an option. Once such instance would be a headless server with no graphical desktop. Or maybe you’ve found a particular applicaiton that is only offered as a source package. For these you are going to have to know your way around command line installation.

In this article I am going to show you the basics of some of the more popular package management systems as well as the basics of installing via source. I will not spend too much time on each (otherwise this article could grow rather overwhelming). By the end of this article you should know how to install, querey, and remove applications with the more popular tools.

Source

Let’s start from the source. Generally when you download a package for installation that ends with tgz, gz, bz2, or *zip this will be a source installation. For these installations you are going to take advantage of some powerful compilation tools. But before you can start the compilation you have to unpack the source directory. If your file ends with a “bz2″ you will first have to ucompress the file will the command bunzip2 APPLICATION.tar.bz2. This will result in a new file like APPLICATION.tar. Tar is an archive system that rolls up directories into a file. To unpack the directory you would issue a command similar to tar xvf APPLICATION.tar. Unpacking the directory would then result in a directory (in our example) APPLICATION.

If the downloaded file ended in tgz or gz then you have a compressed archive and you simply have to add the “z” switch to the tar command to both uncompress and unpack the archive. This command would look like tar xvfz APPLICATION.tgz, which would result in the directory APPLICATION.

Once you have your directory unpacked you need to change into that directory (with the command cd APPLICATION). Once inside this directory issue the ls command. You will most likely see either a README file or an INSTALL file. Open those up and see if there are any special instructions for installation. If there are no special instructions then the standard compilation steps will most likely work. Here’s how this works:

  • su to the root user
  • From within the APPLICATION directory issue the command ./configure. This will generate a make file for the compilation.
  • Issue the command make.
  • Issue the command make install

That’s it. If all went as planned, the application should be installed.

RPM

RPM is the Red Hat Package Manager. Installing via RPM is actually quite simple. Here’s how this works. Once you have downloaded the rpm file you want to install, open up a terminal window and issue the following commands:

  • su (you will be prompted to enter the root password)
  • rpm -ivh filename.rpm (where filename is the actual name of the file you downloaded)

That’s it. If all went well your package should now be installed.

If you want to make sure your package was installed you can issue the command rpm -q filename and you should see the name of the package and the version that is installed.

If you want to remove that package you just installed (or another package) issue the command:

rpm -e filename

and the package will disappear.

APT-GET

This is one of the best installation systems available. With apt-get you do not have to download a package, you just have to know the name. Here’s how apt-get works (I am going to assume Ubuntu is the distribution, so you’ll make use of sudo). Open up a terminal window and issue the following:

sudo apt-get install package_name

to install the needed package.

To remove a package with apt-get you would issue the command:

sudo apt-get remove package_name

to remove the package from your system.

URPMI

The urpmi system is from the Mandriva distribution and is similar to apt-get. To install a package with urpmi you would open up a terminal window, become the root user, and issue the following command:

urpmi package_name

to install the needed package.

To remove a package with this system you would issue the command:

urpme package_name

and the package will be removed.

DPKG

This is the Debian installer and is as easy to use as any other. To use dpkg you will open up a terminal window and issue the following command to install a package:

sudo dpkg -i package_name

to install a package.

To remove a package issue the command:

sudo dpkg -r package_name

and the package will be gone.

Final Thoughts

There you go. A very basic description of package management with the more popular tools. Yes, there is much, much more to them than what you have just read, but this will give you enough of a foundation to get you going

Bitdefender USB Immunizer

Bitdefender USB Immunizer is a free and easy to use tool that helps make sure you transfer the files, not the viruses. It disables autorun-related threats before they access the computer. Once installed, it constantly watches for newly inserted USB storage devices and immunizes them on the fly.


Wednesday 24 October 2012

Download Ubuntu GNOME Remix 12.10


Ubuntu GNOME Remix 12.10 has been released!

Ubuntu GNOME Remix, a Linux distribution which aims to become an official Ubuntu flavour, uses GNOME Shell as the default "shell" and tries to provide a "mostly pure GNOME desktop experience built from the Ubuntu repositories".

GNOME Shell by default
Ubuntu GNOME Remix 12.10 uses GNOME Shell 3.6.1 by default, along with most of the GNOME 3.6 application stack, so it basically has the features you've seen in our GNOME 3.6 post.

Here's the new GNOME Shell 3.6 message tray:

ubuntu gnome remix 12.10 screenshots

ubuntu gnome remix 12.10 screenshots


Since GDM 3.6.1 is included as well, you'll also get the cool new GNOME 3.6 lock screen:
ubuntu gnome remix 12.10 screenshots


Here are a few more GNOME Shell screenshots:


ubuntu gnome remix 12.10 screenshots

ubuntu gnome remix 12.10 screenshots


Default packages

ubuntu gnome remix 12.10 screenshots
As you would expect, Ubuntu GNOME Remix 12.10 tries to offer most of the GNOME 3.6 applications: Web (Epiphany) 3.6, Evolution 3.6, Gedit 3.6, etc.


ubuntu gnome remix 12.10 screenshots

But there are some packages which aren't updated to version 3.6: Aisleriot, Nautilus, System Settings, and Totem:

ubuntu gnome remix 12.10 screenshots
Nautilus 3.4.2
That's because Ubuntu itself uses older versions of these apps, so Ubuntu GNOME Remix is stuck with them as well. But you can update Nautilus or Totem to version 3.6 by using the GNOME3 Team PPA.


There are also some GNOME applications which aren't included by default, like Boxes or GNOME Documents. And you won't find any of the Ubuntu-specific applications as well: Ubuntu One or Ubuntu Software Center aren't included in Ubuntu GNOME Remix since they aren't official GNOME apps.

Instead of Ubuntu Software Center, it uses "Software" (gnome-packagekit), which includes its own update manager:

ubuntu gnome remix 12.10 screenshots

Applications included by default: Web (Epiphany) 3.6.0, Nauilus 3.4.2, GNOME Tweak Tool, Abiword and Gnumeric, Evolution 3.6.0, Cheese, Gwibber, Rhythmbox 2.97, GNOME games, Shotwell, Simple Scan, Transmission, GNOME Packagekit.

The classic (fallback) session is included by default as well, but is only used if your hardware can't run GNOME Shell.


Artwork


As you would expect, Ubuntu GNOME Remix 12.10 uses the default GNOME 3 artwork: Adwaita for the GTK theme and the GNOME icon theme, along with the official GNOME 3.6 wallpaper.

But, at least compared to the beta, there is now a Plymouth theme as well as an Ubiquity installer slideshow:


The slideshow uses images for all the slides except the last one, which is common with the other Ubuntu flavours (which tells the user where he can get support). That's probably because the work was done by a small team and there wasn't enough time to get everything ready, this being the first Ubuntu GNOME release.


GNOME Shell was the missing piece and now, with 12.10, Ubuntu has all the popular DEs covered: from Xfce, KDE and LXDE to GNOME Shell or Unity (although these last 2 are not DEs but "shells"), even though Ubuntu GNOME Remix is not official yet. But let's hope it will become an official Ubuntu flavour with 13.04 Raring Ringtail.


Download Ubuntu GNOME Remix 12.10


Download Ubuntu GNOME Remix 12.10 - and remember to read the official release notes!


Tuesday 23 October 2012

Ubuntu extra Repositories


Extra Repositories / Universe / Multiverse

In addition to the officially supported package repositories available for Ubuntu, there exist additional community-maintained repositories which add thousands more potential packages for installation. Two of the most popular are the Universe and Multiverse repositories. These repositories are not officially supported by Ubuntu, but because they are maintained by the community they generally provide packages which are safe for use with your Ubuntu computer.


Packages in the Multiverse repository often have licensing issues that prevent them from being distributed with a free operating system, and they may be illegal in your locality.


Be advised that neither the Universe or Multiverse repositories contain officially supported packages. In particular, there may not be security updates for these packages.

Many other package sources are available, sometimes even offering only one package, as in the case of package sources provided by the developer of a single application. You should always be very careful and cautious when using non-standard package sources, however. Research the source and packages carefully before performing any installation, as some package sources and their packages could render your system unstable or non-functional in some respects.

By default, the Universe and Multiverse repositories are enabled but if you would like to disable them edit /etc/apt/sources.list and comment the following lines:

sudo gedit /etc/apt/sources.list

deb http://archive.ubuntu.com/ubuntu hardy universe multiverse  deb-src http://archive.ubuntu.com/ubuntu hardy universe multiverse    deb http://us.archive.ubuntu.com/ubuntu/ hardy universe  deb-src http://us.archive.ubuntu.com/ubuntu/ hardy universe  deb http://us.archive.ubuntu.com/ubuntu/ hardy-updates universe  deb-src http://us.archive.ubuntu.com/ubuntu/ hardy-updates universe    deb http://us.archive.ubuntu.com/ubuntu/ hardy multiverse  deb-src http://us.archive.ubuntu.com/ubuntu/ hardy multiverse  deb http://us.archive.ubuntu.com/ubuntu/ hardy-updates multiverse  deb-src http://us.archive.ubuntu.com/ubuntu/ hardy-updates multiverse    deb http://security.ubuntu.com/ubuntu hardy-security universe  deb-src http://security.ubuntu.com/ubuntu hardy-security universe  deb http://security.ubuntu.com/ubuntu hardy-security multiverse  deb-src http://security.ubuntu.com/ubuntu hardy-security multiverse  


Friday 19 October 2012

FlareGet - Graphical Download Accelerator For Linux


FlareGet claims that it is the best download manager for Linux. It's lightweight, fast, full-featured and multi-segment download manager. Because of its multi-segment feature, flareGet will make the download faster than using single-segment connection.

flareGet key features:
  • Amazingly Fast Downloads: flareGet uses dynamic file segmentation algorithm to increase the download speed.
  • Absolutely Free and 100% Clean: Although flareGet is a closed source software, it can be used freely with no charge, no ads, and no spyware.
  • Multi-Protocol Support: flareGet supports HTTP, HTTPS and FTP protocols to let you download files from internet. It also supports pipeling for HTTP and HTTPS protocols.
  • Intelligent File Management: The downloaded files will be categorized based on their file extension and grouped into separate folders (just like IDM does).
  • Ubuntu application indicator support.

Installing flareGet on Ubuntu
Download the binary archive here. Once downloaded, extract the archive and install the appropriate *.deb package according to your system architecture (32bit or 64bit).


You're done! flareGet can be accessed from the menu.


Regards ~
Linux Repository...


Sunday 7 October 2012

Any Problem When Compile a java program in ubuntu Terminal


Hello Ubuntu User Guest, Any problem when Running JAVAC command in Terminal ah?..

Read Instruction Below :

  $ javac
 
The program 'javac' can be found in the following packages:
 
* openjdk-6-jdk
 
* ecj
 
* gcj-4.4-jdk
 
* gcj-4.6-jdk
 
* gcj-4.5-jdk
 
* openjdk-7-jdk
 
Try: sudo apt-get install <selected package>

select any one above for eg :


sudo apt-get install openjdk-6-jdk
I would suggest you to make sure you have the JDK installed or install it (sudo apt-get install openjdk-6-jdk).
Also make sure that your JAVA_HOME environment variable is pointing to the JDK and not to the JRE (you can see in your output that currently the java home path is set to

 /usr/lib/jvm/java-6-openjdk/jre.

check javac

or type in terminal

/usr/bin/javac


How to Set JAVA_HOME / PATH variables Under Linux

How to Set JAVA_HOME / PATH variables


I just need a help to show me how to setup java path on Linux. How can I set JAVA_HOME and PATH variables for every user under my Linux system?

~/.bash_profile is a startup script which generally runs once. This particular file is used for commands which run when the normal user logs in. Common uses for .bash_profile are to set environment variables such as PATH, JAVA_HOME, to create aliases for shell commands, and to set the default
permissions for newly created files.

Set JAVA_HOME / PATH for a single user

Login to your account and open .bash_profile file
$ vi ~/.bash_profile
Set JAVA_HOME as follows using syntax export JAVA_HOME=<path-to-java>. If your path is set to /usr/java/jdk1.5.0_07/bin/java, set it as follows:
export JAVA_HOME=/usr/java/jdk1.5.0_07/bin/java
Set PATH as follows:
export PATH=$PATH:/usr/java/jdk1.5.0_07/bin
Feel free to replace /usr/java/jdk1.5.0_07 as per your setup. Save and close the file. Just logout and login back to see new changes. Alternatively, type the following command to activate the new path settings immediately:
$ source ~/.bash_profile
OR
$ . ~/.bash_profile
Verify new settings:
$ echo $JAVA_HOME
$ echo $PATH

Tip: Use the following command to find out exact path to which java executable under UNIX / Linux:
$ which java

Please note that the file ~/.bashrc is similar, with the exception that ~/.bash_profile runs only for Bash login shells and .bashrc runs for every new Bash shell.

Set JAVA_HOME / PATH for all user

You need to setup global config in /etc/profile OR /etc/bash.bashrc file for all users:
# vi /etc/profile
Next setup PATH / JAVA_PATH variables as follows:
export PATH=$PATH:/usr/java/jdk1.5.0_07/bin

Save and close the file. Once again you need to type the following command to activate the path settings immediately:
# source /etc/profile
OR
# . /etc/profile


Saturday 6 October 2012

TOR BROWSER BUNDLE FOR LINUX


What is the Tor Browser Bundle (TBB)?

The Tor software protects you by bouncing your communications around a distributed network of relays run by volunteers all around the world: it prevents somebody watching your Internet connection from learning what sites you visit, it prevents the sites you visit from learning your physical location, and it lets you access sites which are blocked.

The Tor Browser Bundle lets you use Tor on Windows, Mac OS X, or Linux without needing to install any software. It can run off a USB flash drive, comes with a pre-configured web browser to protect your anonymity, and is self-contained.

Quick videos on how to use TBB

How to download and use Tor Browser in different operating systems:

How to verify the digital signatures of Tor Browser in different operating systems:


Linux instructions

Download the architecture-appropriate file above, save it somewhere, then run one of the following two commands to extract the package archive:

tar -xvzf tor-browser-gnu-linux-i686-2.2.39-1-dev-LANG.tar.gz

or

tor-browser-gnu-linux-x86_64-2.2.39-1-dev-LANG.tar.gz

(where LANG is the language listed in the filename).

Once that's done, switch to the Tor browser directory by running:

cd tor-browser_LANG

(where LANG is the language listed in the filename).

To run the Tor Browser Bundle, execute the start-tor-browser script:

./start-tor-browser

Graphics App ‘Pinta’ Updates, Brings Improved Tools, Layer Blending

A new release of graphics app Pinta has been made available for download.

Pinta is a basic-but-useful drawing tool and image manipulator based on the Windows app 'Paint.NET'.

Version 1.4 sees a number of notable new features and improvements made, and various bug and performance issues fixed.

What's New?

A new release means new things and Pinta 1.4 is no exception.

  • New Magic Wand tool selections (Union, Exclude, Xor, and Intersect)
  • New layer blending modes (accessed via Layer Properties dialog)
  • Color Picker now supports different sampling sizes, as well as sampling from a single layer or the entire image.

  • Lower RAM usage for Open Images Pad and History
  • New "Copy Merged" command
  • Canvas sports a drop-shadow
  • Text Tool supports more non-English character inputs and copy/paste

Does it Crash?

My chief complaint with Pinta has always been that its usefulness has always been undermined by its instability.

But, I'm pleased to say, performance has taken a gargantuan leap forward in this release. Pinta 1.4 did not crash once during the half hour or so I spent fooling about in it.

What changed? 39 bugs were squashed, including some super annoying crash-causing culprits like 'Copy/Paste'.

Install Pinta 1.4 in Ubuntu

With new features and a fresh new slate in performance, Pinta 1.4 is well worth checking out.

It is to Linux what Paint.NET is to Windows; it's not super advanced and won't suit Photoshop enthusiasts. But when you're looking to knock together a silly image or adjust a photo before you share it online, Pinta is the best app for the job.

Ubuntu 11.10, 12.04 and 12.10 users will need to add the Pinta Stable PPA to get this release.

  • sudo add-apt-repository ppa:pinta-maintainers/pinta-stable
  • sudo apt-get update && sudo apt-get install pinta

Don't want to add a PPA? The most recent version of Pinta in the Ubuntu Software Center of Ubuntu 12.04 is version 1.1.


Stay Connected with LinuxRepository.Blogspot.in ... .. .

GNOME Shell Classic Systray, Message Notifier And Notesearch, Updated For GNOME Shell 3.4 (Ubuntu 12.04)

A few more GNOME Shell extensions have been updated for GNOME Shell 3.4/3.4.1 and are now available for Ubuntu 12.04 Precise Pangolin in the WebUpd8 GNOME 3 PPA: Classic Systray, Message Notifier and Notesearch.
To use any of the extensions below, firstly add the WebUpd8 GNOME 3 PPA:
sudo add-apt-repository ppa:webupd8team/gnome3  sudo apt-get update


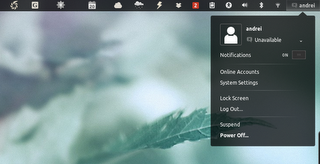
GNOME Shell Classic Systray extension (previously known as GNOME Shell GNOME 2 notifications) moves the icons from the GNOME Shell message tray to the top bar. It doesn't move the notifications, but only application icons (tray applets / icons) like for instance Dropbox, Jupiter Applet and so on.

To install GNOME Shell Classic Systray in Ubuntu 12.04 or 11.10, use the following command:
sudo apt-get install gnome-shell-classic-systray

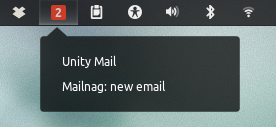
GNOME Shell Message Notifier shows how many conversations with unread messages you have on the top GNOME Shell bar. It works with Empathy, email clients like Mailnag and basically any application that displays notifications with the number of unread messages. Note that the number displayed by the extension is the number of conversations with new messages and not the total number of messages.

The extension was updated recently and besides support for GNOME Shell 3.4, the extension now shows where the notifications come from when you press the icon on the GNOME Shell top bar.

To install GNOME Shell Message Notifier in Ubuntu 12.04 or 11.10, use the following command:
sudo apt-get install gnome-shell-message-notifier

After activating the extension using GNOME Tweak Tool, the extension may show up as disabled but it actually still works.


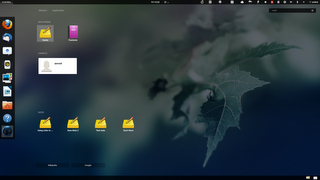
GNOME Shell Notesearch is an extension that can be used to search for Gnote or Tomboy notes in GNOME Shell Overview. Install it using the following command:
sudo apt-get install gnome-shell-extension-notesearch

By default, the extension searches for Gnote notes. To set it to use Tomboy instead, use the following command:
gsettings set com.github.charkins.notesearch app Tomboy    
And to switch back to Gnote, use:
gsettings set com.github.charkins.notesearch app Gnote


I've also updated the official GNOME Shell extensions to support the latest GNOME Shell 3.4.1 (they were broken after a recent update; sorry for the delay!) which is available in Ubuntu 12.04 Precise Pangolin. See our previous post about extensions updated for GNOME Shell 3.4 and Ubuntu 12.04 Precise Pangolin: Official GNOME Shell Extensions, Weather, System Monitor, MediaPlayer And GPaste Available For GNOME Shell 3.4 [PPA - Ubuntu 12.04]

Insync: Google Drive Client For Linux


Insync is a Google Drive client for Mac, Windows and mobile devices that recently got support for Linux (beta).

Besides full sync support for Google's cloud storage service, Google Drive, which includes Google documents (unlike Grive) that it downloads as .doc, .xls, .ppt, etc., Insync for Linux also comes with Nautilus integration, tray / Ubuntu AppIndicator support that displays recent changes, errors and the sync status and support for multiple accounts.

Insync Beta 2 for Linux was released today, bringing .deb and .rpm packages, so the installation should be a lot easier now. Besides this, beta 2 also brings various fixes and improvements:
  • fixes unicode issues
  • faster inotify
  • faster set emblems (using ctypes)
  • faster startup
  • icon and .desktop file

Update: just one day after beta 2, Insync for Linux beta 3 was released:

  • fixes unicode issues (finally!)
  • date format bug fixed
  • adding new directories - warn on errors instead of fail
  • deb depends on: libappindicator3-1, xdotool, nautilus, python-nautilus
  • fixes 32bit deb not working with older ubuntu's


Using Insync for Linux


Once installed, launch Insync from Dash / the menu. A new tab will open in your default browser, asking you to log in to Insync using your Google Account and link your computer to Insync / Google Drive.

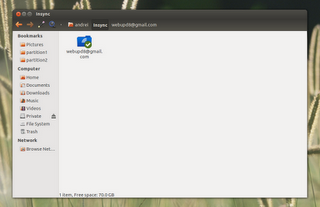
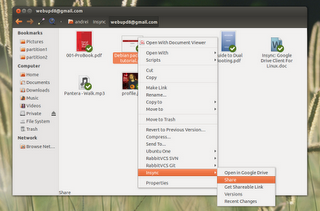
After this, a new folder called "Insync" will be created in your home folder. In this folder, a directory with your Gmail email address is created, where your Google Drive files are synced / stored. If you add multiple accounts (from the AppIndicator: Account Information > Add New Account), you'll have multiple folders here, each using the account's email address:


Right clicking your Google Drive files in Nautilus, you can select to get a sharable link or open the file in Google Drive:\

The Recent Changes and Versions menu items you see in the screenshot above haven't been implemented yet, and should be available with Insync 1.0.


Currently, there's no GUI way of re-linking your computer so if you've accidentally unlinked your computer from Insync, to link it again close Insync, then run the following command in a terminal:
rm -r ~/.config/Insync
Then start Insync and the page which links Insync with your computer should open in your default browser.


Download Insync for Linux


Insync Beta 2 for Linux is available as .deb and .rpm and you can download it using the direct links below:


DEB:


RPM:


In case the links don't work anymore, see the Insync beta 3 announcement HERE.

If you've previously installed Insync beta 1, to clean up you need to remove the Nautilus extension (which is now installed in a different location sync Insync Beta 2/3 installs globally) using the following command:
rm ~/.local/share/nautilus-python/extensions/insync_plugin.py

If you encounter bugs, report them HERE.

Indicator Remindor 12.10 Released With New Features


Indicator Remindor, an Ubuntu appindicator that can be used to schedule reminders or alarms, has been updated to version 12.10.

Indicator Remindor 12.10 comes with a new design for some UI parts like the time, date and command, along with a new option to have a reminder popup dialog window, which you can use to make sure you don't miss any important reminders.


Another new feature in the latest Indicator Remindor is an option to change the indicator icon (similar to Ubuntu Messaging Menu behaviour) colour when a notification runs.

Other changes include: more powerful dates (check out the application help for more info) and bug fixes, including the bug that caused the commands feature not to work properly.


Install Indicator Remindor in Ubuntu


The latest Indicator Remindor 12.10 is available in its PPA for Ubuntu 12.04 - add the PPA and install it using the commands below:
sudo add-apt-repository ppa:bhdouglass/indicator-remindor  sudo apt-get update  sudo apt-get install indicator-remindor

Until official builds are released for Ubuntu 12.10, you can manually download the .deb available in the PPA, I've tested it and it should work just fine.

If you encounter bugs, report them @ Launchpad.

Speed Up apt-get Downloads With apt-fast Ubuntu PPA

Apt-fast is a script that can "drastically improve APT download speed" by using command line download accelerators such as Axel or Aria2 with multiple connections per package.
We've actually blogged about apt-fast back in 2009 but since then, the script has received some important changes so I've wanted to update our readers with its current status.

Since our previous apt-fast articles, the script has gained support for multiple download tools (axel and aria2), an option to download the binary in the current folder as well as an option to use either apt-get or aptitude. Further more, apt-fast has an official PPA for Ubuntu users and it's even present in the official repositories for some


Linux distributions, like PCLinuxOS for instance.

Features:
  • uses aria2 or axel, 2 great command line download tools to improve download speed, with multiple connections per package
  • supports both apt-get and aptitude
  • proxy support
  • supports most apt-get functions: install, upgrade, dist-upgrade, build-dep and so on

Don't expect the script to do wonders for slow Internet connections (though I can't really comment here since I have a really fast connection), but if you have a decent Internet connection, you should see some pretty big improvements in downloading the binaries. This is especially useful for installing / upgrading multiple or large packages, such as games (hint for 0 AD fans).

apt-fast only speeds up downloading the binaries, so even though 'apt-fast update' works, this command isn't ran using a download accelerator so the speed is the same as with apt-get. Support for the 'update' command is, however, planned for a future release. If you can help implement this, see the apt-fast GitHub page.


Install apt-fast


Ubuntu users can install the latest stable apt-fast from its official PPA:
sudo add-apt-repository ppa:apt-fast/stable  sudo apt-get update  sudo apt-get install apt-fast  


When installing apt-fast in Ubuntu via its PPA, the package asks you if you want to use aptitude or apt-get, what download manager to use (axel or aria2c). If, later on, you want to change some of the apt-fast options, use the following command:
  sudo dpkg-reconfigure apt-fast

aria2c is the download tool recommended by the apt-fast developers, mostly because it supports resuming downloads.

For other Linux distributions, you can download apt-fast from GitHub.


Using apt-fast


apt-fast works the same as apt-get and all you have to do is use "sudo apt-fast install PACKAGE" instead of "apt-get" and so on for any operation.

Install a package:
sudo apt-fast install PACKAGE

Upgrade packages:
sudo apt-fast upgrade

Install the build dependencies for a package:
sudo apt-fast build-dep PACKAGE

Like I was saying, the commands are identical to apt-get and all you have to do is replace "apt-get" with "apt-fast". There's also a download command ("apt-fast download PACKAGE") which downloads the binary into the current directory.

Tuesday 2 October 2012

Geary is a lightweight email reader for the GNOME desktop

Introducing Geary Version 0.2 includes major new features, including attachments, full HTML composition, and more. We recommend that all users upgrade.
A lightweight email program designed around conversations and built for the GNOME desktop.


Download 0.2
User GuideMailing ListWiki

Geary

Geary is a new email reader for GNOME designed to let you read your email quickly and effortlessly. Its interface is based on conversations, so you can easily read an entire discussion without having to click from message to message. Geary is still in early development and has limited features today, but we're planning to add lightning-fast searching, multiple account support, and much more. Eventually we'd like Geary to have an extensible plugin architecture so that developers will be able to add all kinds of nifty features in a modular way.
Geary is written in Vala, is designed to integrate with the GNOME desktop and is completely free. It runs on Debian, Fedora, Ubuntu and other free operating systems.
We released Geary 0.2 on October 1, 2012. See our wiki to learn how to download, build and run Geary. For help with frequently asked questions, visit our help documentation. If you're running Ubuntu 12.04 (Precise), you can install Geary directly from the Yorba PPA.